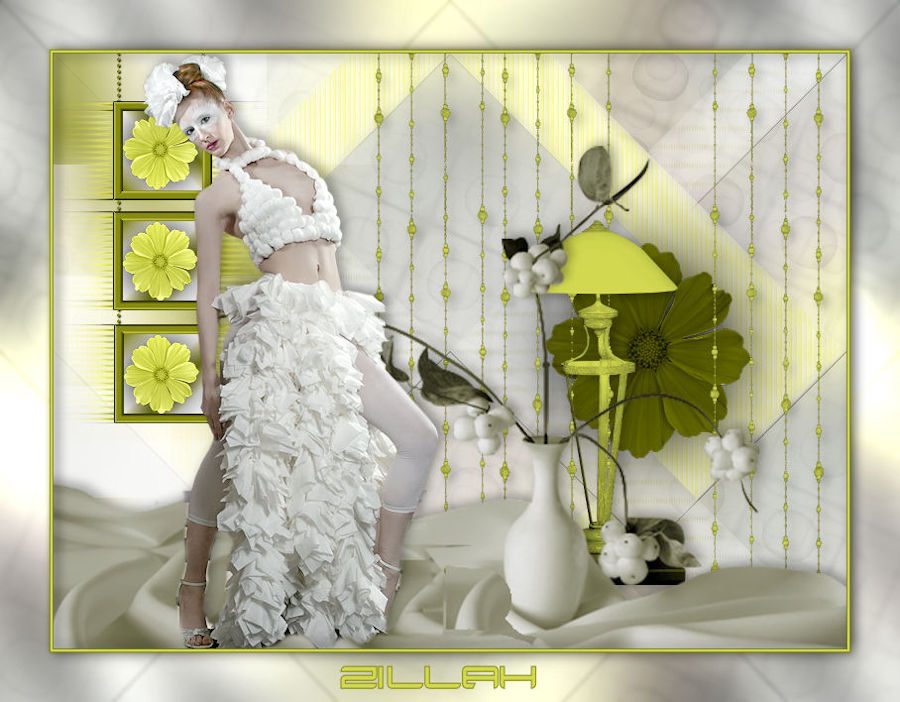
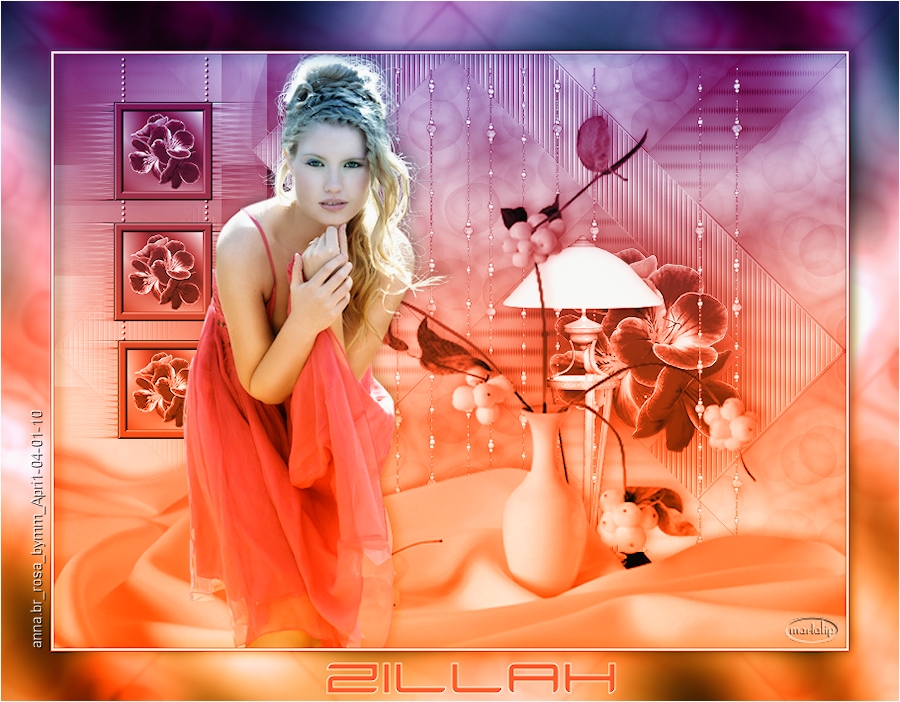
The tutorial:
01
Open a new
transparent image of 800 x 600 px
Fill the Layer with the Gradient

02
Selections - Select All
Maximize "Mary 0412-12" from
tray
Edit - Copy
Minimize to tray we need it again later
On your work image: Edit -
Paste - Paste Into Selection
Selections - Select None
03
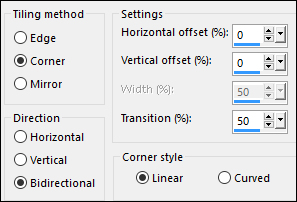
Effects - Image Effects - Seamless
Tiling
Adjust - Blur - Gaussian Blur

04
Layers - Duplicate
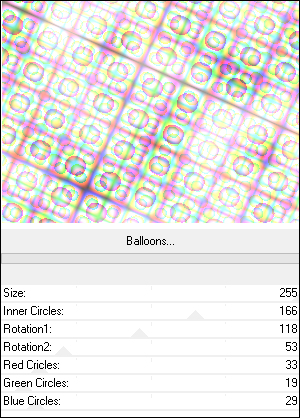
Effects - Plugins - Filters Unlimited
2.0 - Two Moon - Balloons
Layer Palette: Change the Blend
Mode of this Layer to
Luminance(Legacy) and lower the
Opacity to 20
05
Effects - Plugins - Filters Unlimited
2.0 - Two Moon - Quilt
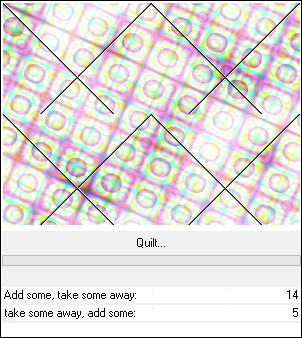
Window - Duplicate
Name and save this file for later
in the tutorial
06
On your original work image: Still on
the Top Layer
Layers - Duplicate
Image - Mirror - Mirror Vertical
(Image - Flip in older versions of
PSP)
Layers - Merge - Merge Down
07
Layers - New Raster Layer
Selections - Load/Save - Load
Selection from Disk
"Msb_Sel_Zillah_01"

Fill the Selection with the
Gradient
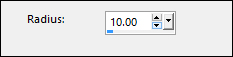
Adjust - Blur - Gaussian Blur
Keep selected
08
Effects - Plugins - Filters Unlimited
2.0 - Two Moon - Warm Cloth
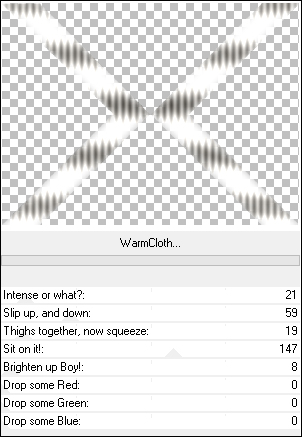
Layer Palette: Change the Blend
Mode of this Layer to Soft
Light
Layer Palette: Click on the middle
Layer (Copy of Raster 1)
Edit - Cut - (or hit Delete on your
keyboard)
Selections - Select None
09
Layer Palette: Click on the Top
Layer
Layers - New Raster Layer
Selections - Load/Save - Load
Selection from Disk
"Msb_Sel_Zillah_02"
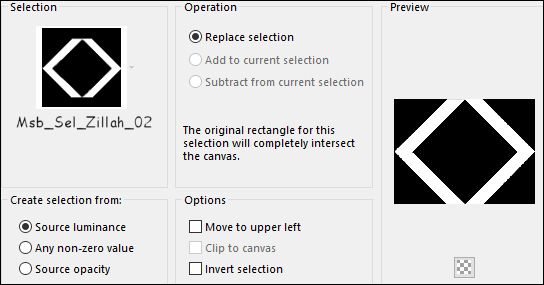
Fill the Selection with the
Gradient
Adjust - Blur - Gaussian Blur
Effects - Texture Effects - Blinds
Effects - Edge Effects - Enhance
Selections - Select None
10
Selections - Load/Save - Load
Selection from Disk
"Msb_Sel_Zillah_03"
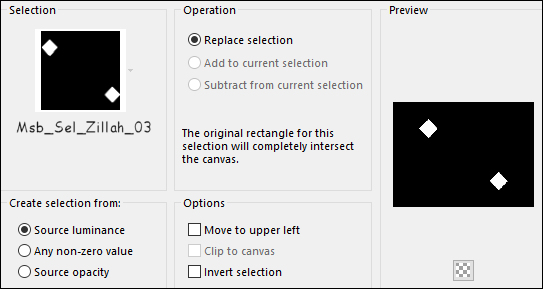
Edit - Cut (or hit Delete on your
keyboard)
Selections - Select None
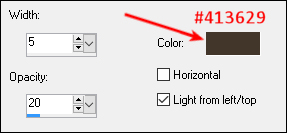
11
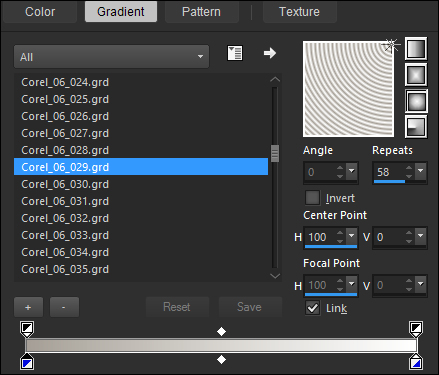
Materials Palette: Change the
Foreground Gradient back to Color -
#70665e 
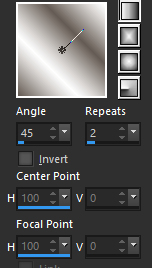
Change the Foreground to Gradient
to (Corel_06_029) -
Style:Linear
Layers - New Raster Layer
Selection Tool (S) Custom Selection


Fill the Selection with the
Gradient 
Selections - Select None
Layer Palette: Lower the Opacity of
this Layer to 44
12
Layers - Duplicate
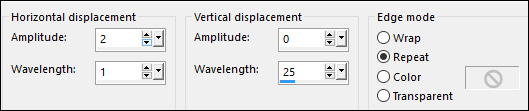
Effects - Distortion Effects -
Wave
Layer Palette: Lower the Opacity of
this Layer to 22
Layers - Duplicate
Effects - Plugins - Toadies - Weaver -
Default Settings
Layer Palette: Raise the Opacity of
this Layer to 60
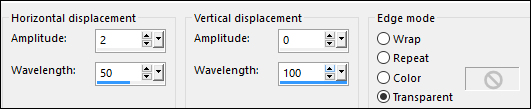
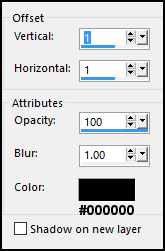
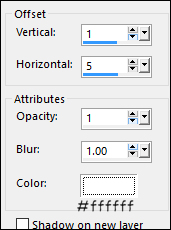
Effects - Image Effects - Offset

13
Layer Palette: Click on the Top
Layer
Maximize "bloemen-2" from
tray
Edit - Copy
On your work image: Edit -
Paste - Paste As New Layer
Image Resize - 45% - Resize
All Layers - not checked
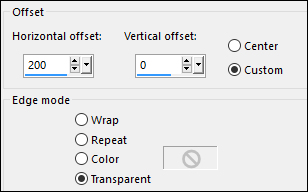
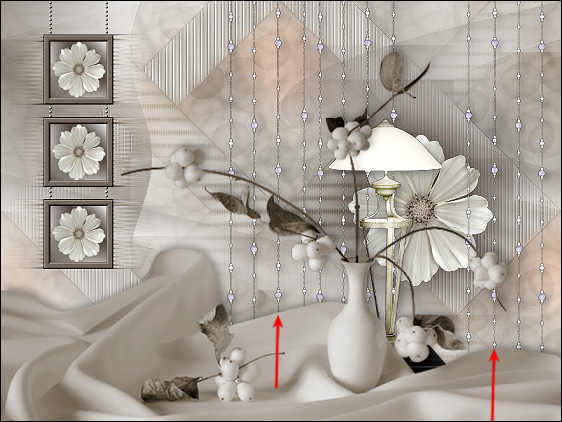
Effects - Image Effects - Offset
14
Layers - Duplicate
Layer Palette: Click on Raster 5
Adjust - Hue and Saturation -
Hue/Saturation/Lightness
Adjust - Blur - Gaussian Blur
15
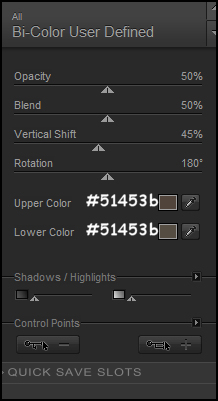
Layer Palette: Click on the Top
Layer
Effects - Plugins - Nik Software -
Color Efex Pro 3.0 Complete -
Bi-Color User Defined
Adjust - Sharpness - Sharpen
Layers - Merge - Merge Down
Edit - Copy
16
Materials Palette: Change
the Foreground Gradient back to
Color - #70665e
Layers - New Raster Layer
Selection Tool (S) - Custom
Selection
Fill the Selection with the
Foregroundcolor
Selections - Modify - Contract -
10px
Keep selected
17
Change the Foregroundcolor back
to Gradient (same settings)
Fill the Selection with the
Gradient
Keep selected
Edit - Paste - Paste As New Layer
(image is still in memory)
Image - Resize -37% - Resize All
Layers - not checked
Move into the frame selection like
this:
Adjust - Sharpness - Sharpen
Selections - Invert
Edit - Cut (or hit Delete on
your keyboard)
18
Layers - Merge - Merge
Down
Selections - Float
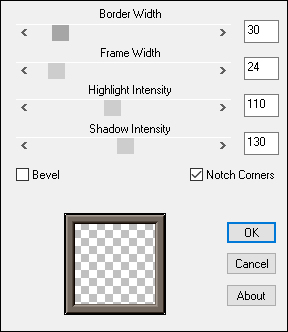
Effects - Plugins - BorderMania -
Frame#2
Selections - Select None
19
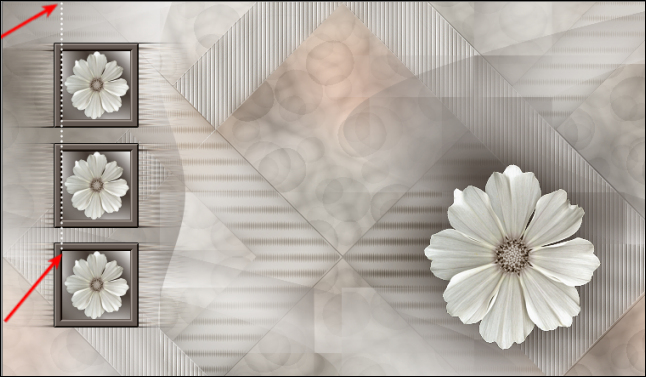
Layers - Duplicate
Edit - Repeat Duplicate Layer
Arrange the two Duplicate Layers
like this:
Layer Palette: Click on the Top
Layer
Layers - Merge - Merge Down
Edit - Repeat Layer Merge Down
(All three frames are now on one
Layer)
20
Layers - Duplicate
Effects - Distortion Effects -
Wave
Effects - Distortion Effects -
Wind
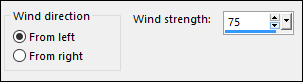
Effects - Distortion Effects -
Wind
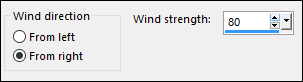
Adjust - Sharpness - Sharpen
21
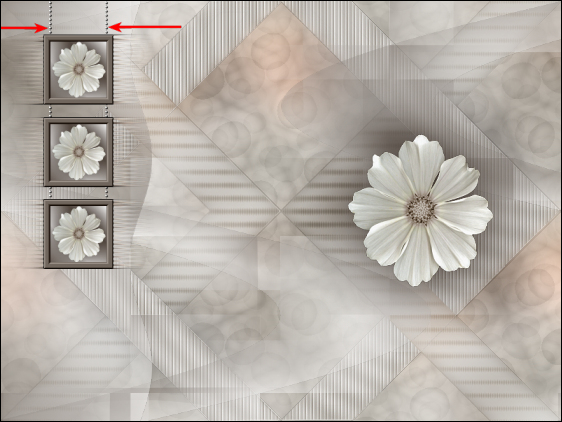
Layer Palette: Click on the Top
Layer
Layers - Arrange - Move Up
Layers - Merge - Merge Down
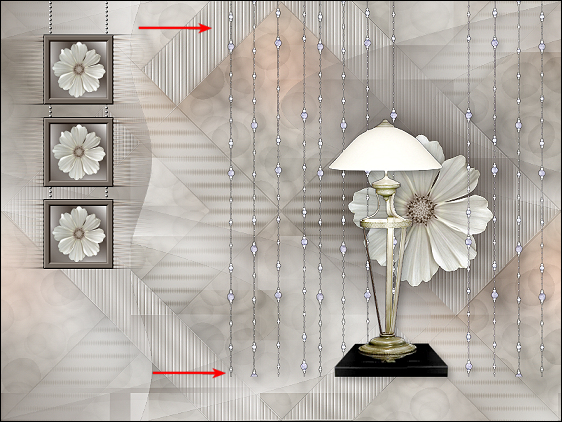
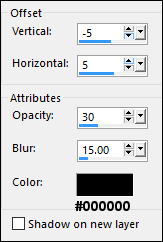
Effects - Image Effects - Offset

22
Materials Palette: Change
the Foreground Gradient back to
Color - #ffffff 
Close the Background color
Pen Tool (V) Styled Line -
Corel_13_022 (Or Diamond in
older versions of PSP)


Hold down the Shift key and draw a
straight line like this:
Layer Palette: Right click and
Convert to Raster Layer
Layers - Arrange - Move Down
23
Layers - Duplicate
Image - Mirror - Mirror Horizontal
(Image - Flip in older versions of
PSP)
Move like this:
Layers - Merge - Merge Down
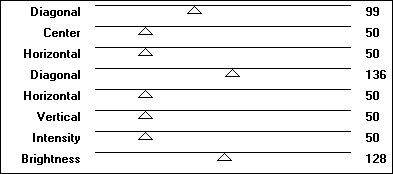
Effects - 3D Effects - Drop
Shadow
24
Maximize "tubeclaudiaviza-mix175"
from tray
Edit - CopyOn your work Image:
Edit - Paste - Paste As New Layer
Image - Resize - 65% - Resize All
Layers - not checked
Adjust - Sharpness - Sharpen
Move to the Right side of your work
like this:
Effects - 3D Effects - Drop
Shadow
25
Maximize "kTs_msk_26 copie"
from tray
Edit - Copy
On your work image: Edit -
Paste - Paste As New Layer
Image - Mirror -
Mirror Horizontal (
Image - Mirror in previous PSP
Versions)
Image - Resize - 125% - Resize all
Layers - not checked
Move down to the Bottom edge of your
work like this:
26
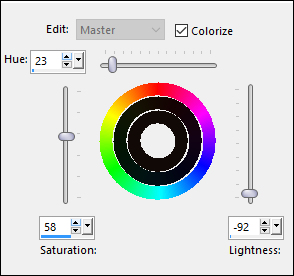
Adjust - Hue and Saturation -
Colorize

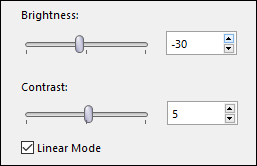
Adjust - Brightness and
Contrast
Effects - 3D Effects - Drop
Shadow
27
Maximize "Mary 0412-12" from
tray
Edit - Copy
On your work image: Edit - Paste
- Paste As New Layer
Image - Resize - 65% - Resize All
Layers - not checked
Move to the Left side of your work
like this:
Effects - 3D effects - Drop
Shadow
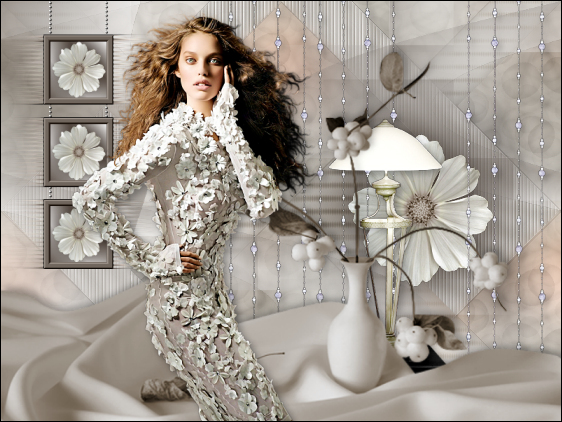
Layers - Merge - Merge All Flatten
28
Image - Add Borders - Symmetric
checked - 1px - #70665e
Image - Add Borders - Symmetric
checked - 2px - Foregroundcolor -
#ffffff
Image - Add Borders - Symmetric
checked - 1px - #70665e
Selections - Select All
Selections - Modify - Contract -
4px
Selections - Invert
Effects - 3D Effects - Drop
Shadow
Effects - 3D Effects - Drop
Shadow
29
Selections - Select All
Image - Add Borders - Symmetric
checked - 50px - #70665e
Selections - Invert
Open the image created in step#3
Layers - Merge - Merge All Flatten
Edit - Copy
On your work image:
Edit - Paste - Paste Into Selection
Adjust - Blur - Gaussian Blur

Selections - Promote Selection to
Layer
Effects - Plugins - Graphics Plus -
Cross Shadow
Selections - Invert
Layers - Merge - Merge Visible
Effects - 3D Effects - Drop
Shadow
Effects - 3D Effects - Drop
Shadow
Selections - Select None
30
Image - Add Borders - Symmetric
checked - 1px - #70665e
Text Tool (T) Font: Xenotron
Size: 24px Foregroundcolor -
#ffffff Backgroundcolor -
#70665e

Type the word "Zillah"
Layer Palette: Right click and
Convert to Raster Layer
Effects - 3D Effects - Drop
Shadow
Layers - Merge - Merge All Flatten
31
Optional:
Image - Resize - Width
900 Pixels - Resize all Layers checked
Add your name or watermark, save as JPG
file and you're done!
If
you wish you can post your result on my Face book Page