02
Layers - New Raster Layer
Selection Tool
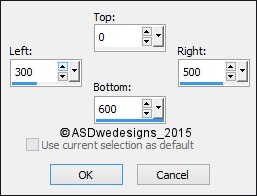
- Rectangle  - Custom Selection:
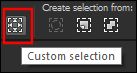
Fill the Selection with the Backgroundcolor
 ( Right Mouse Click)
Selections -
Select None
Effects -
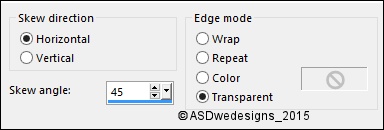
Geometric Effects - Skew
Effects -
3D Effects - Drop Shadow - Vertical 5 -
Horizontal 5 - Opacity 30 -
Blur - 15 - Color - #3c312b
 (Foregroundcolor)
Repeat with the Vertical and Horizontal
Offset to Minus 5
03
Layers
- Duplicate
Effects -
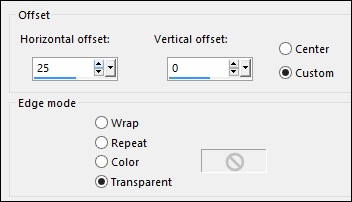
Image Effects - Offset
Layers
- Duplicate
Effects -
Image Effects - Offset -
Same settings
Layers - Merge - Merge Down
Edit - Repeat Layers Merge Down
04
Layers
- Duplicate
Edit - Repeat Duplicate Layer
Effects -
Plugins - VM Natural - Weave
Distortion

Effects -
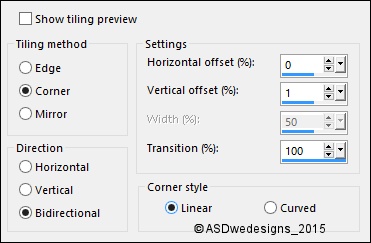
Image Effects - Seamless Tiling
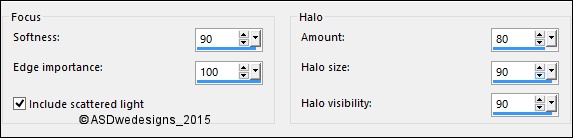
Adjust -
Softness - Soft Focus
Layers - Arrange - Move Down
Edit - Repeat Arrange Layer
Layer Palette - Double click on this Layer and set the
Blend Mode to "Soft Light"
05
Layer Palette
- Click on the Top Layer
Effects -
Plugins - VM Natural - Legoland
Effects -
Distortion Effects - Warp

Effects - Edge Effects -
Enhance
Effects -
3D Effects - Drop Shadow - Vertical 1 -
Horizontal 1 - Opacity 100 -
Blur - 1 - Color - #000000
.jpg)
Layer Palette - Double click on this Layer and set the
Blend Mode to "Screen" and the Layer Opacity to
50
06
Layer Palette
- Click on the Second Layer from the Top
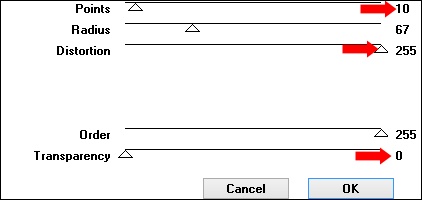
Effects -
Reflection Effects - Kaleidoscope
Selections - Select All
Selections -
Float
Selections -
Defloat
Layer Palette -
Click on the Second Layer from the Bottom
Edit - Cut (Or hit
the Delete Key of your Keyboard)
Selections - Select
None
07
Layer Palette -
Click on the Second Layer from the Top
Swap Materials
Effects - Plugins -
It@lian Editors Effect - Effetto
Fantasma - Sposta- X 10 - Sposta
Y 43
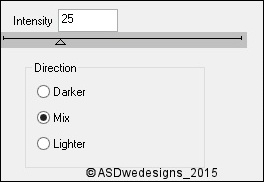
Effects - Edge Effects - Enhance
Layer Palette - Double click on this Layer and set the
Blend Mode to "Burn" and the Layer Opacity to
17
08
Layers
- Duplicate
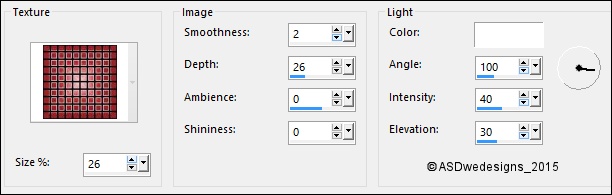
Effects - Texture
Effects - Texture - Red042
09
Swap Materials again
Layers - New Raster Layer
Selections -
Load/Save Selection - Load Selection From Disk
- Msb_Mystic
Balls_01 Replace
Selection & Source luminance checked
Fill the Selection with the Backgroundcolor
-
Layer Palette - Double click on this Layer and set the
Blend Mode to "Multiply" and the Layer Opacity to
36
10
Layers - New Raster Layer
Fill with the Gradient 
Adjust - Blur
- Gaussian Blur - 50
Effects -
Plugins - Simple - Diamonds
Effects -
Plugins - Simple - Blintz
11
Layers
- Duplicate
Image - Mirror - Mirror
Horizontal ( Image - Mirror
in previous PSP Versions)
Image - Mirror -
Mirror Vertical ( Image - Flip in
previous PSP Versions)
Layer Palette
- Double click on this Layer and set
the Layer Opacity of this Layer to
50
Layers
- Merge - Merge Down
Image - Resize - 75% - Resize
all Layers not checked
Effects - Edge
Effects - Enhance More
Layer Palette - Double click on this Layer and set the
Blend Mode to "Screen" and the Layer Opacity to
46
12
Selections - Select All
Selections -
Float
Selections -
Defloat
Layer Palette -
Click on the Second Layer from the Bottom
Edit - Cut (Or hit
the Delete Key of your Keyboard)
Selections - Select
None
13
Layer Palette -
Click on the Second Layer from the Top
Effects - Image
Effects - Seamless Tiling - Default settings
14
Layer Palette: Set the
Foreground Gradient back to
color
Layers - New Raster Layer
Selections -
Load/Save Selection - Load Selection From Disk
- Msb_Mystic
Balls_02
Fill the Selection with the Foregroundcolor
Selections
- Select None
Effects -
Plugins - DSB Flux - Bright
Noise
Effects -
Image Effects - Seamless Tiling - Default
settings
Adjust - Sharpness Sharpen
Layer Palette - Double click on this Layer and set the
Blend Mode to "Soft Light" and the Layer Opacity to
75
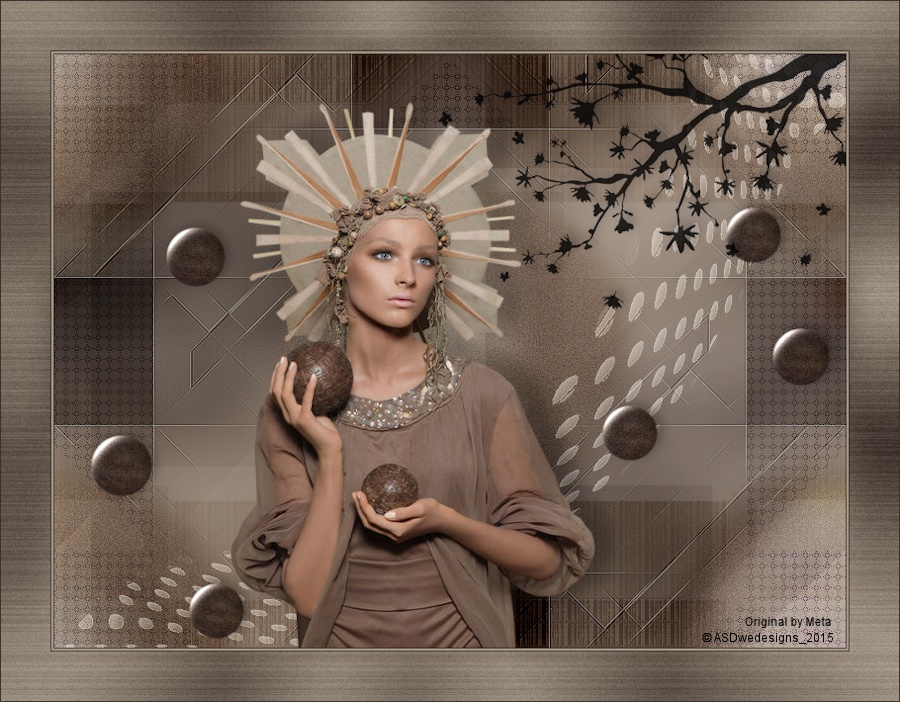
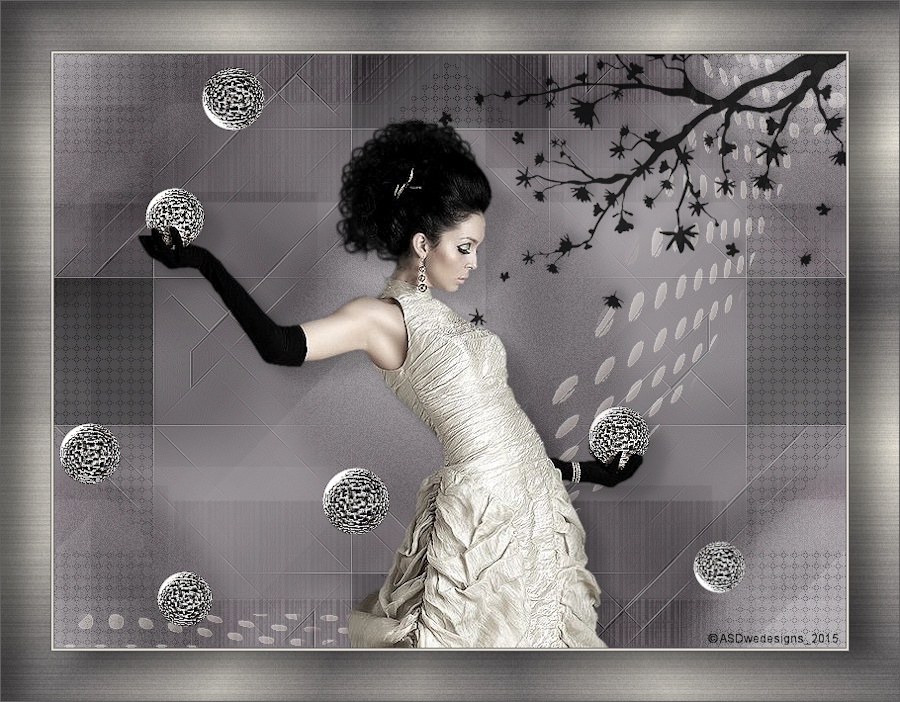
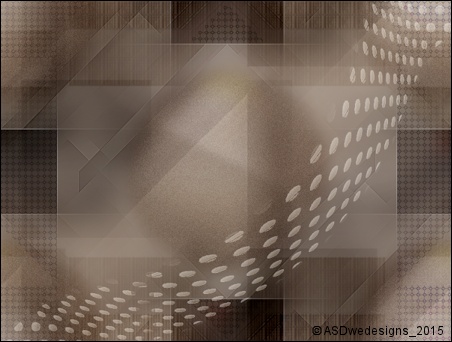
Your work looks like
this now:
Minimize to tray for now, ( save also as PSP file in case PSP
shuts down on you)
15
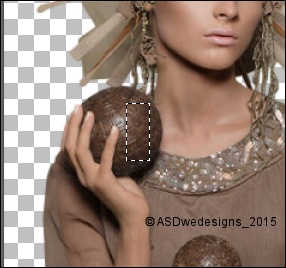
Open Tube "Grace’s_TLC_Beauty_in_Balance"
Selection Tool -
Rectangle 
Make a Selection like this:
Edit - Copy
Open a new transparent image of 100 x 100
px
Selctions - Select All
Edit - Paste Into Selection
Effects -
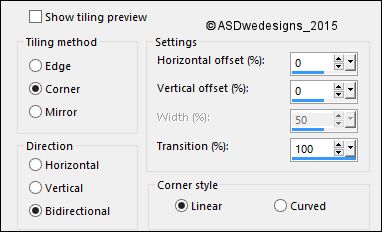
Image Effects - Seamless Tiling
16
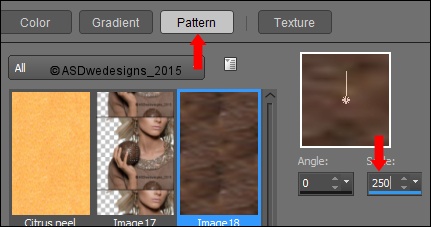
Color Palette: Set the Foregroundcolor to
Pattern en look for the 100 x 00 image
you just made
Open a new
transparent image of 200 x 200 px
Fill with the Pattern
Effects -
Plugins - DSB Flux - Bright
Noise
Save as JPG file to the Environments folder
of PSP and give it a
name
17
Maximize your
work image
Layer
Palette - Click on the Top
Layer
Layers -
New Raster Layer
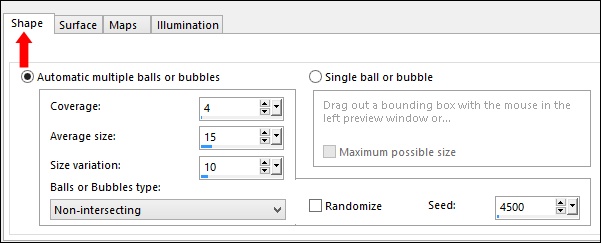
Effects -
Artistic Effects - Balls and Bubbles:
Shape Tab:
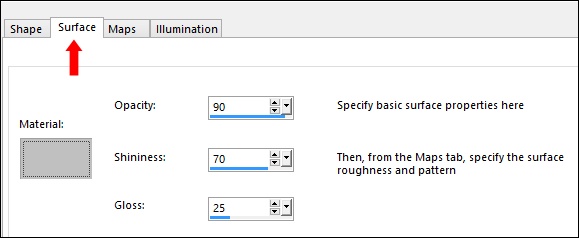
Surface Tab: Color
#c0c0c0
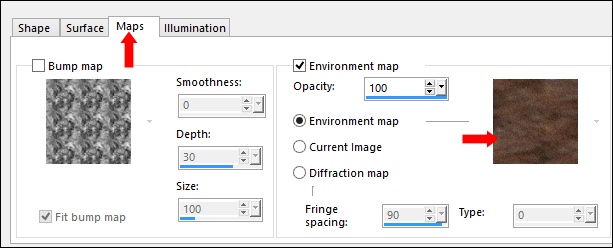
Maps Tab
Double click on
the Right Viewing Pane
and select the Pattern you
just saved
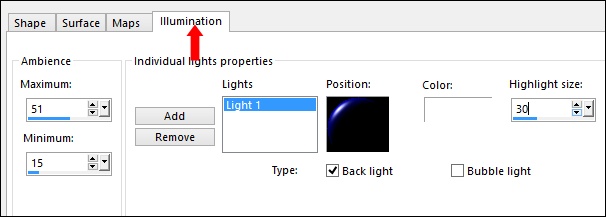
Illumination Tab - Color
#ffffff
NOTE: The outcome depends on
your PSP version.
Effects - 3D Effects - Drop
Shadow - Vertical Mius 3 -
Horizontal 5 - Opacity 30 -
Blur - 15 - Color - #000000
18
Open Tube "pspB884" .
Edit - Copy
On your work image: Edit -
Paste As New Layer
Effects - Image Effects -
Offset

Adjust - Hue and Saturation -
Hue/Saturation/Lightness (If you are using
different colors play with the settings to match your
tube)
Effects -
3D Effects - Drop Shadow - Vertical Minus
5 - Horizontal 5 - Opacity 30
- Blur - 15 - Color -
#000000
Layer Palette
- Double click on this Layer and set
the Layer Opacity of this Layer to
80
19
Open Tube "Grace’s_TLC_Beauty_in_Balance" .
Edit - Copy
On your work image: Edit -
Paste As New Layer
Move like this:

Adjust - Sharpness -
Sharpen
Effects -
3D Effects - Drop Shadow - Vertical Minus
15 - Horizontal 20 - Opacity 15
- Blur - 15 - Color -
#000000
Effects - 3D Effects - Drop
Shadow - Vertical 3 -
Horizontal 3 - Opacity 15 -
Blur - 15 - Color - #000000
20
Color Palette: Set the Foreground
Pattern to Gradient
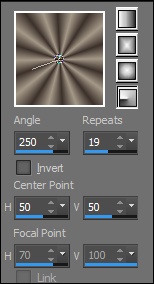
Image - Add Borders -
Symmetric checked - 1 px - #3c312b
Image - Add Borders -
Symmetric checked - 2 px - #a49888
Image - Add Borders -
Symmetric checked - 1 px - #3c312b
Selections
- Select All
Image - Add
Borders - Symmetric checked - 50 px -
#a49888
Selections - Invert
Fill the Selection with the
Gradient
Adjust - Blur
- Gaussian Blur - 15
Keep selected
21
Selections
- Promote Selection to Layer
Effects -
Plugins - DSB Flux - Bright
Noise
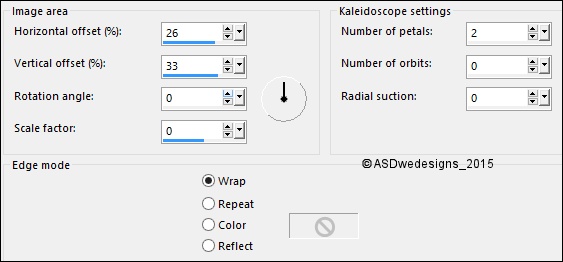
Effects -
Reflection Effects - Rotating Mirror
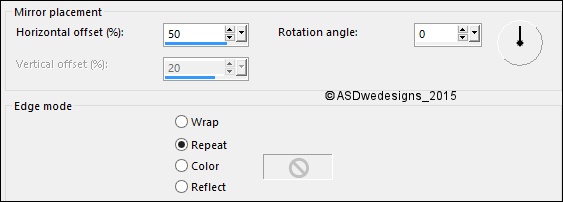
Selections - Select None
22
Layers
- Duplicate
Image - Mirror -
Mirror Horizontal (
Image - Mirror in previous PSP
Versions)
Layer Palette
- Double click on this Layer and set
the Layer Opacity of this Layer to
50
Layers
- Merge - Merge Down
.
Layer Palette -
Double click on this Layer and set
the Layer Opacity of this Layer
to60
23
Magic Wand Tool

- Mode: Add /Shift -
Tolerance 0 - Contiguous checked -
Anti Alias Checked - Click in
the Transparent part of the
frame
Selections -
Invert
Layers - New
Raster Layer
Effects 3D
Effects - Cutout - Vertical 10 -
Horizontal 25 - Opacity 48 -
Blur - 40 - Fill interior with color
NOT checked - Color #000000
Selections -
Select None
Image - Add
Borders - Symmetric checked - 1 px -
#3c312b
Optional:
Image - Resize - Width 900 Pixels -
Resize all Layers checked