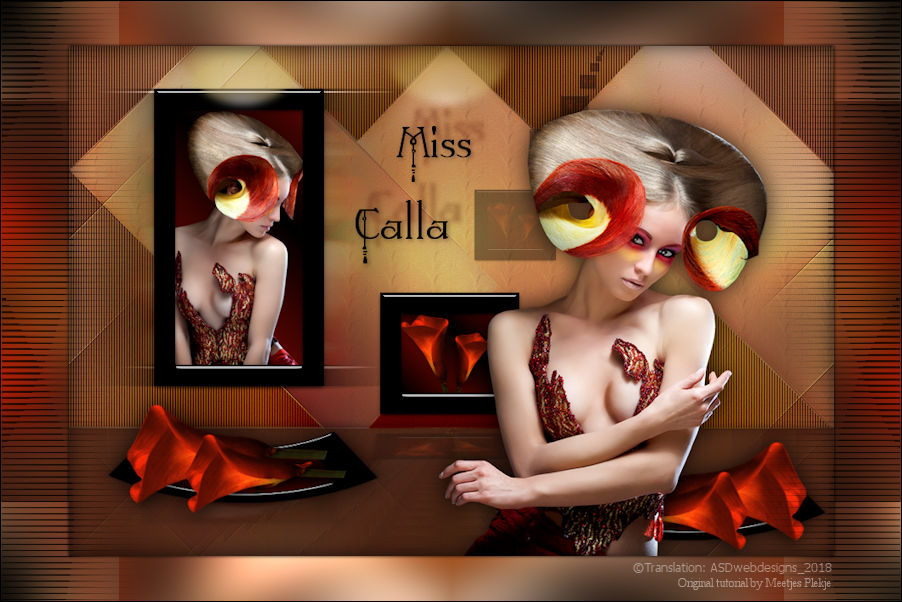
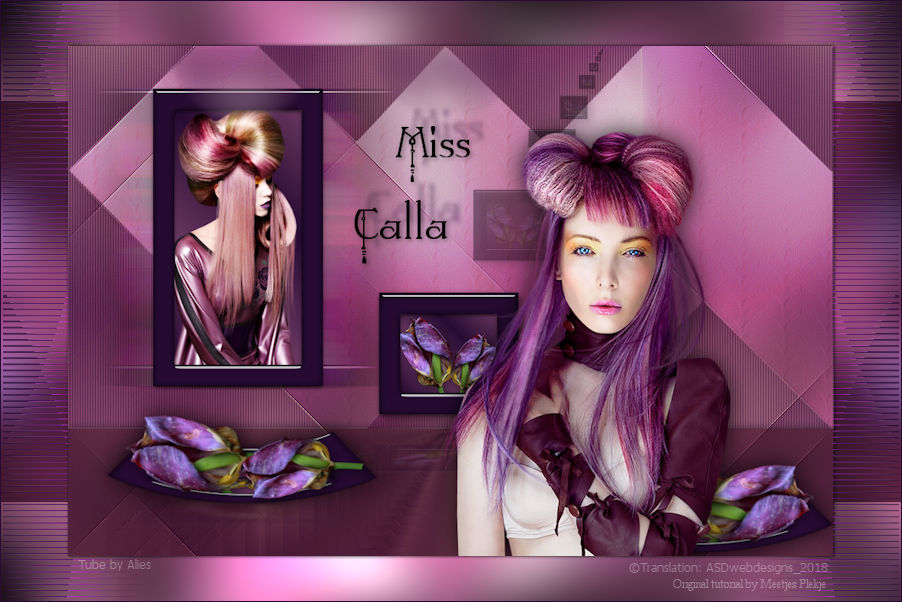
The tutorial:
01
Open a new
transparent image of 900 x 600 px
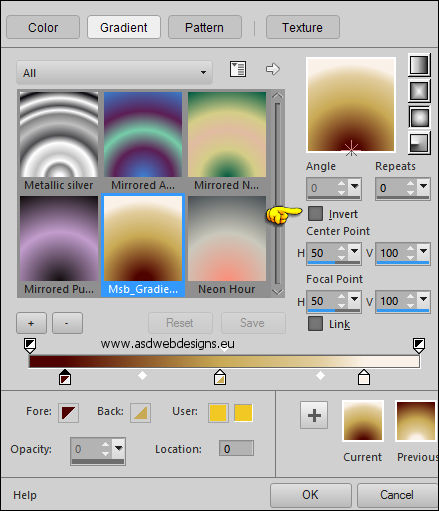
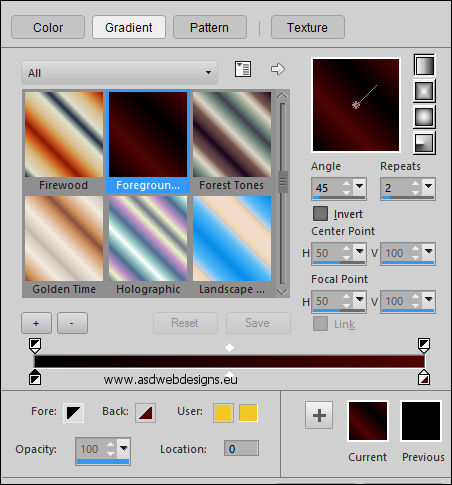
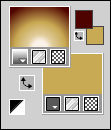
Fill with the
Gradient 
Selections - Select
All
Maximize
Tube
"Mary 0812-37" from tray
Note: Using your own tube may
give a different result, to achieve the same result use the tube
provided and colorize to match your work
set the
Blend Mode to Luminance
(Legacy)
Edit - Copy
Minimize to tray again, you
need it again later
On your work image:
Edit - Paste As New
Layer
Selections - Select
None
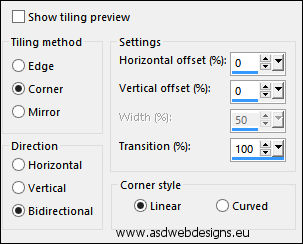
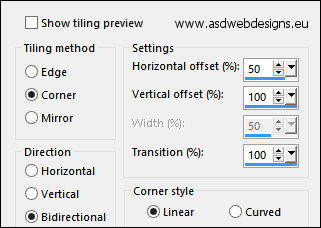
Effects - Image
Effects - Seamless Tiling
Adjust - Blur -
Gaussian Blur - Radius 50
02
Layers - Duplicate
Effects -
Plugins - Simple - Blintz
Effects - Image
Effects - Seamless
Tiling
03
Layers - Duplicate
Image - Mirror -
Mirror Horizontal
Image - Mirror -
Mirror Vertical
Layer Palette - Double click on this Layer and
set the Opacity of this Layer to
50
Layers - Merge - Merge
Visible
Effects - Edge Effects
- Enhance More
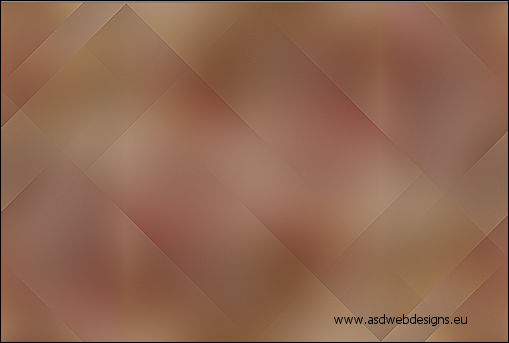
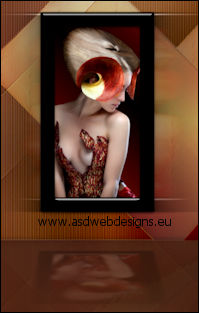
Result:
04
Layers -
Duplicate
Effects -
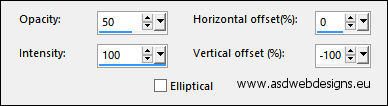
Reflection Effects - Feedback
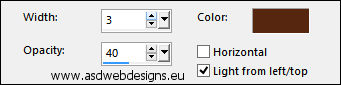
Press K on your
keyboard to activate the
Pick Tool
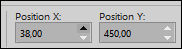
Enter this parameter for the
Y Position on the
Toolbar
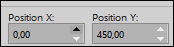 (0, 450)
Hit any key on your keyboard to
close the Pick Tool
Effects - 3D
Effects - Drop Shadow - Vertical &
Horizontal 0 - Opacity 30 -
Blur 15 - Color #000000

Layer Palette -
Double click on this Layer and set
the Blend Mode to "Multiply"
05
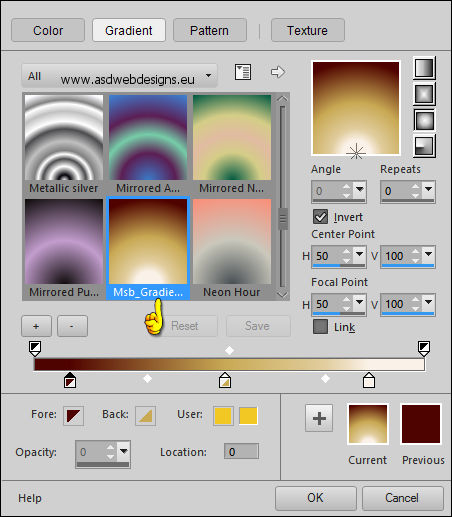
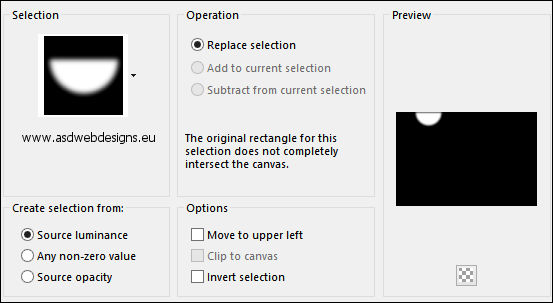
Color Palette:
Uncheck Invert
Layers - New Raster
Layer
Selections - Load/Save
Selection - Load Selection From Disk
- Msb_Sel_MissCalla_01
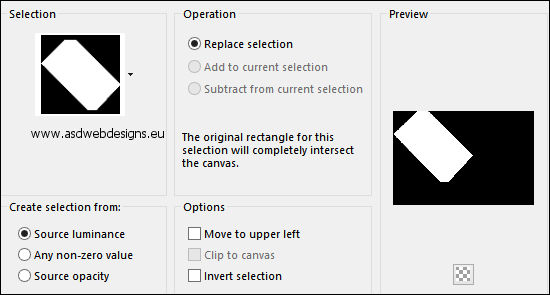
Fill the Selection
with the Gradient 
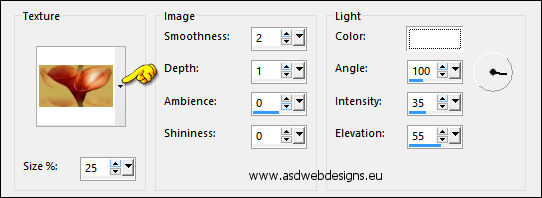
Effects - Texture
Effects - Texture -
Msb_Texture_Calla_01
- Color #ffffff 
Effects - Plugins
- Graphics Plus - Cross Shadow
Effects - 3D
Effects - Drop Shadow - Vertical 0 -
Horizontal 5 - Opacity 5 -
Blur 30 - Color #000000
06
Selections - Load/Save Selection -
Load Selection From Disk - Msb_
Sel_MissCalla_02
Fill the
Selection with the Gradient
Effects - Texture
Effects - Texture -
Msb_Texture_Calla_01
- Color #ffffff
Effects - Plugins
- Graphics Plus - Cross Shadow
Effects - 3D
Effects - Drop Shadow - Vertical 0 -
Horizontal 5 - Opacity 5 -
Blur 30 - Color #000000
07
Selections - Load/Save Selection -
Load Selection From Disk - Msb_
Sel_MissCalla_03
Fill the
Selection with the Gradient
Effects - Texture
Effects - Texture -
Msb_Texture_Calla_01
- Color #ffffff
Effects - Plugins
- Graphics Plus - Cross Shadow
Effects - 3D
Effects - Drop Shadow - Vertical &
Horizontal 0 - Opacity 5 -
Blur 30 - Color #000000
Selections -
Select None
Layer Palette - Double click on this Layer and set the
Blend Mode to "Overlay" and the Layer Opacity to
50
08
Layer Palette - Click
on the Bottom Layer
Layers - New Raster
Layer
Selections - Load/Save Selection -
Load Selection From Disk - Msb_
Sel_MissCalla_04
Fill the
Selection with the Gradient
Effects - Texture Effects -
Blinds - Color: #572711

Effects - Plugins
- Graphics Plus - Cross Shadow
Selections - Select
None
Layer Palette - Double click on this Layer and set the
Blend Mode to "Burn" and the Layer Opacity to
28
Effects - Edge Effects -
Enhance
Layers -
Merge - Merge Visible
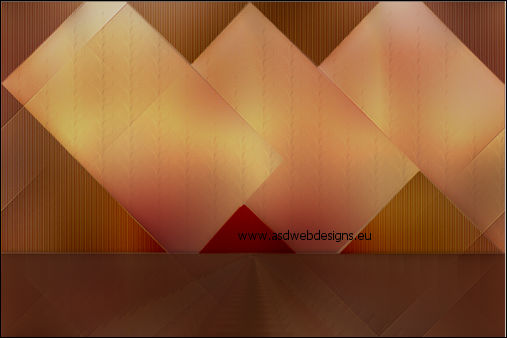
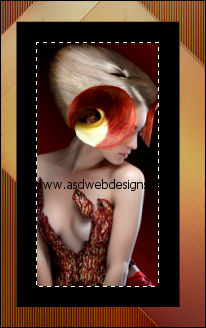
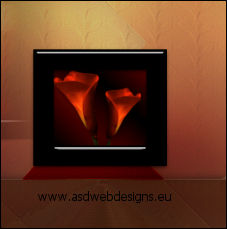
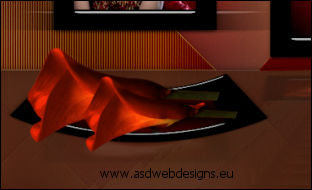
Result:
09
Color Palette: Set the
Foregroundcolor to #000000
and the
Backgroundcolor to #4f0400

Layers - New Raster
Layer
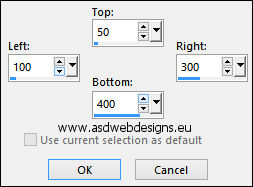
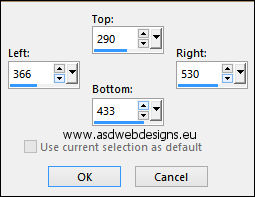
Selection Tool -
Rectangle  - Custom Selection:
Fill with the
Foregroundcolor
Selections - Modify -
Contract - 25 px
Edit - Cut (Or hit the
Delete Key of your Keyboard) 
Keep selected
10
Color Palette:
Set your Foregroundcolor to
Foreground/Background Gradient (Corel_06_029) -
Style:
Linear
Layers - New Raster
Layer
Fill with
the Gradient 
Layers - Arrange -
Move Down
Maximize
Tube
"Mary
0812-37.pspimage" from
tray
Edit - Copy
Minimize to tray again, you
need it again later
On your work image:
Edit - Paste As New Layer
Image - Resize - 40% -
Resize all Layers not checked (Depending
on your Tube Size)
Move into the Selection like
this:
Selections Invert
Edit - Cut (Or hit
the Delete Key of your Keyboard)
Selections - Select
None
11
Layer Palette - Click
on the
Top Layer
Selections - Select
All
Selections -
Float
Effects -
Plugins - Alien Skin Eye Candy 5
Impact - Glass - Settings Tab:
Preset
Clear
Or if this is not
working for you with these
settings:

Selections - Select
None
Layers - Merge - Merge
Down
Edit -
Repeat Layer Merge Down
12
Layers - Duplicate
Effects - Distortion
Effects - Wind - From Left checked - Wind
Strength:
100
Effects - Distortion
Effects - Wind - From Right checked - Wind
Strength:
100
Layer - Arrange -
Move Down
Adjust - Sharpness -
Sharpen
13
Layer Palette: Click
on the Top Layer
Effects - Plugins -
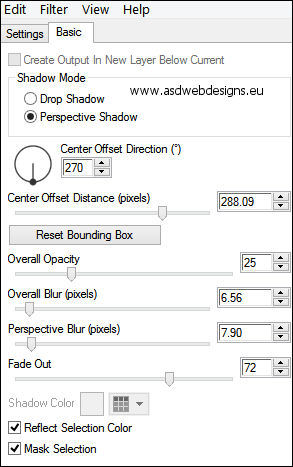
Alien Skin Eye Candy 5 - Impact -
Perspective Shadow - Settings
Tab:Preset Msb_Preset_PS_MissCalla_01
Or if this is not
working for you with these
settings:
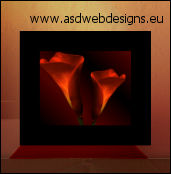
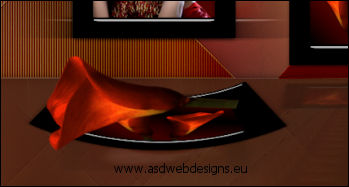
Result:
14
Color Palette:Set the
Foregroundcolor back to color
Layers - New Raster Layer
Selection Tool -
Rectangle - Custom Selection:
Fill with the
Foregroundcolor
Selections - Modify -
Contract - 25 px
Edit - Cut (Or hit the
Delete Key of your Keyboard)
Keep selected
15
Color Palette:
Set your Foregroundcolor back to the
same Gradient
Layers - New Raster
Layer
Fill with
the Gradient
Layers - Arrange -
Move Down
Maximize
Tube
"Calguisarum1239.pspimage" from
tray
Edit - Copy
Minimize to tray again, you
need it again later
On your work image:
Edit - Paste As New Layer
Image - Resize - 30% -
Resize all Layers not checked (Depending
at the size of your Tube)
Move into the Selection like
this:
Selections - Invert
Edit - Cut (Or hit the Delete
Key of your Keyboard)
Selections - Select
None
16
Layers - Duplicate
Image - Resize - 80% -
Resize all Layers not checked
Image - Mirror - Mirror Horizontal
Move like this:
Layers - Merge - Merge Down
Effects - 3D Effects -
Drop Shadow - Vertical &
Horizontal 5 - Opacity 30 -
Blur 15 - Color #000000
Adjust - Sharpness - Sharpen
17
Click on the Top
Layer
Selections - Select All
Selections - Float
Effects - Plugins -
Alien Skin Eye Candy 5 Impact -
Glass - Settings Tab:
Preset Clear
Or if this is not working for you with
these settings:
Selections - Select
None
Layers - Merge - Merge
Down
Edit - Repeat Layer Merge Down
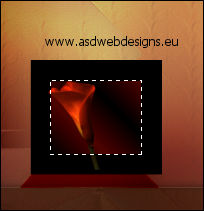
Result:
18
Layers -
Duplicate
LayerPalette: Click on the Layer
below this Layer
Effects - Reflection Effects -
Feedback
Effects - 3D
Effects - Drop Shadow - Vertical & Horizontal
5 - Opacity 40
- Blur 15 - Color #000000
Effects - Plugins -
Alien Skin Eye Candy 5 - Impact -
Perspective Shadow - Settings
Tab:Preset Msb_Preset_PS_MissCalla_02
Or if this is not
working for you with these
settings:
19
Layer Palette: Click
on the Top Layer
Effects - Distortion
Effects - Polar Coordinates
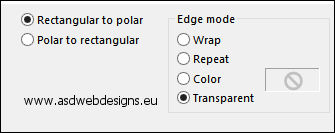
Image - Resize -
90% - Resize all Layers not
checked
Press K on your
keyboard to activate the
Pick Tool
Enter these parameters for the
X and Y Positions on
the Toolbar
 (38,450)
Hit any key on your keyboard to
close the Pick Tool
20
Maximize
Tube
"Calguisarum1239.pspimage" from
tray
Edit - Copy
On your work image:
Edit - Paste As New Layer
Image - Resize - 60% -
Resize all Layers not checked (Depending
of the Size of your Tube)
Image - Free Rotate
(settings depending on your
tube)
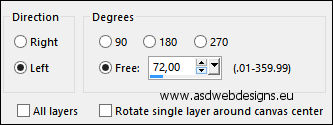
Press K
on your keyboard to
activate the Pick Tool
Enter these
parameters for the X and
Y Positions on the
Toolbar
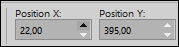 (22,395)
Hit any key on your
keyboard to close the Pick
Tool
Or if you use different tubes move
like this:
21
Layers - Duplicate
Image - Resize -
80% - Resize all Layers not
checked
Move like this:
Layers - Merge -
Merge Down
Effects - 3D
Effects - Drop Shadow - Vertical & Horizontal
5 - Opacity 40
- Blur 15 - Color #000000
Layers - Merge -
Merge Down
Effects - 3D Effects -
Drop Shadow - Vertical & Horizontal
0 - Opacity 80
- Blur 40 - Color #000000
22
Layers - Duplicate
Image - Mirror - Mirror Horizontal
Press K on your
keyboard to activate the
Pick Tool
Enter these parameters for the
X and Y Positions on
the Toolbar
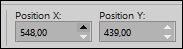 (548,439)
Hit any key on your keyboard to
close the Pick Tool
23
Maximize
Tube
"Mary
0812-38" from tray
Edit - Copy
On your work image:
Edit - Paste As New
Layer
Image - Resize -
70% - Resize all Layers not
checked
Move like this:
Adjust - Sharpness -
Sharpen
Effects - 3D
Effects - Drop Shadow - Vertical & Horizontal
0 - Opacity 80
- Blur 40 - Color #000000
24
Color Palette:
Change the Foregroundcolor to
#4f0400
and the Backgroundcolor
to #c8a954 
Set your
Foregroundcolor to the Msb_Gradient_1-9-12
from the materials- Style:
Sunburst
Layers - New Raster Layer
Selections - Load/Save Selection - Load Selection
From Disk - Msb_ Sel_MissCalla_05
Fill the Selection
with the Gradient
Adjust - Blur -
Gaussian Blur - Rasius:
15
Selections - Select None
Press K on your
keyboard to activate the
Pick Tool
Enter these parameters for the
X and Y Positions on
the Toolbar
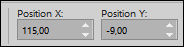 (115,Minus 9)
Hit any key on your keyboard to
close the Pick Tool
25
Layers - Duplicate
Image - Mirror - Mirror
Horizontal
Press K on your
keyboard to activate the
Pick Tool
Enter this parameter for the
X Position on the
Toolbar
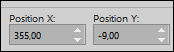 (355)
(355)
Hit any key on your keyboard to
close the Pick Tool
Layers - Merge - Merge Down
Layer Palette - Double click on this Layer and
set the Opacity of this Layer to
55
26
Maximize
Tube
"Wordart_MissCalla" from
tray
Edit - Copy
On your work image:
Edit - Paste As New
Layer
Press K on your
keyboard to activate the
Pick Tool
Enter these parameters for the
X and Y Positions on
the Toolbar
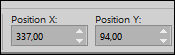 (337,94)
Hit any key on your keyboard to
close the Pick Tool
Effects - 3D Effects - Drop Shadow
- Vertical & Horizontal 2 - Opacity
40 - Blur 8 - Color #000000
Effects - 3D
Effects - Drop Shadow - Vertical Minus 20
- Horizontal 15 - Opacity 40 - Blur
8 - Color #4f0400
27
Layers - Merge - Merge
Visible
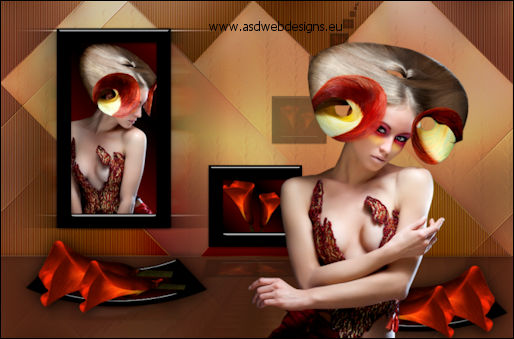
Result:

28
Layers - Duplicate
Image - Resize -
85% - Resize all Layers not
checked
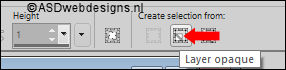
Selection Tool -
Rectangle - Layer Opaque
Effects - 3D
Effects - Drop Shadow - Vertical & Horizontal 0 -
Opacity 100 - Blur 5 - Color #000000
Selections - Invert
Effects - 3D
Effects - Drop Shadow - Vertical & Horizontal 0 -
Opacity 70 - Blur 30 - Color #000000
Selections - Select
None
29
Layer Palette - Click
on the Bottom Layer
Adjust -
Blur - Gaussian Blur - Radius
25
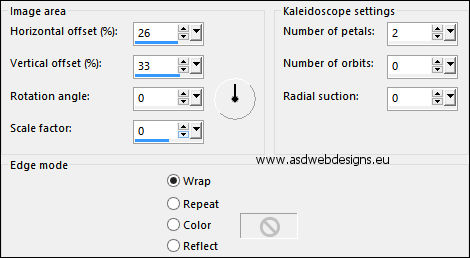
Effects -
Reflection Effects - Kaleidoscope
Effects - Plugins - Graphics
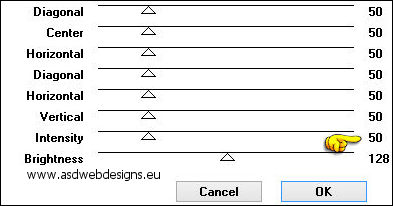
Plus - Cross Shadow - Default settings (6 x 50
& 2 x 128)
30
Color Palette: Set the
Foregroundcolor back to Color
Layer Palette - Click
on the Top Layer
Layers - New Raster Layer
 Paint Brush Tool - "Msb_Brush_MissCalla_01" - Size: 600 -
Step: 32 - Density: 100 -
Rotation: 0 - Opacity: 100 - Blend
Mode: Normal - Continuous checked -
Wet look paint Unchecked
Paint Brush Tool - "Msb_Brush_MissCalla_01" - Size: 600 -
Step: 32 - Density: 100 -
Rotation: 0 - Opacity: 100 - Blend
Mode: Normal - Continuous checked -
Wet look paint Unchecked
Zoom your image smaller if you do
not see the whole Brush
Stamp with the Foregroundcolor at the Left side of your
Image, like this:
Layers - Duplicate
Effects -
Distortion Effects - Wind - From Left checked -
Wind Strength: 100
Effects - Edge Effects - Enhance
Layers - Arrange -
Move Down
31
Layer
Palette - Click on the Top Layer
Layers - Merge - Merge Down
Layers - Duplicate
Image - Mirror - Mirror Horizontal
Note: If you use a female
tube of your own and the lines are
on your tube , erase them with the
Eraser Tool 
32
Image - Add Borders -
Symmetric checked - 1 px - #000000