Open a new
transparent image of 900 x 600 px
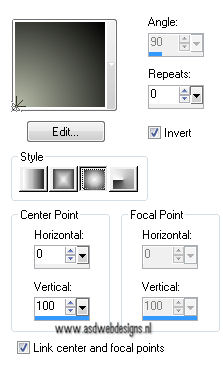
Fill with the Gradient

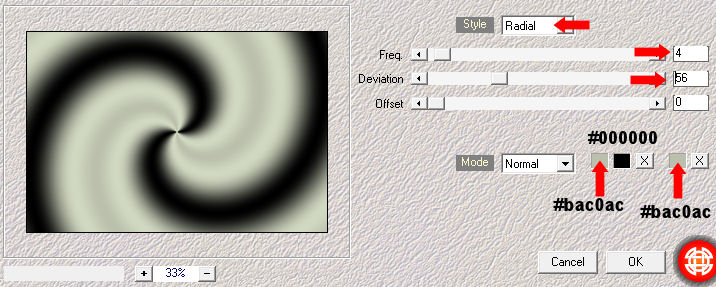
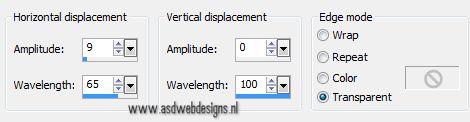
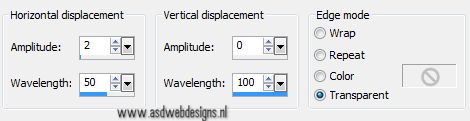
Effects - Plugins – Mehdi – Wavy Lab
Effects - Distortion Effects - Pixelate
02
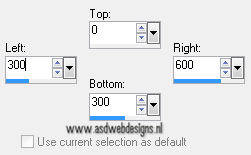
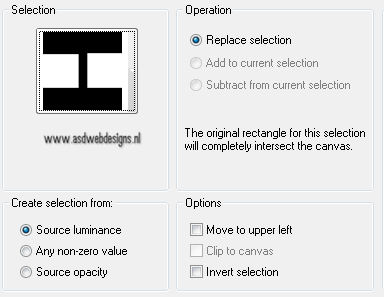
Selection Tool - Rectangle
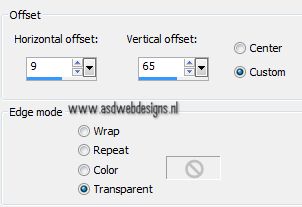
 - Custom Selection:

Selections - Promote Selection to
Layer
Selections - Select None
Effects
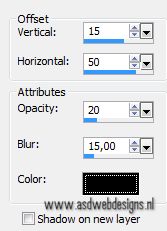
- Plugins – VanDerLee – Unplugged X - Defocus
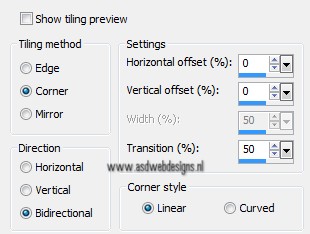
Effects - Image Effects - Seamless Tiling
Layers - Merge - Merge
Visible
Layers - Duplicate
Effects - Plugins – Carolaine and Sensibility –
CS-Reflection
Effects
- Plugins – Graphics Plus – CrossShadow
Effects - Edge Effects - Enhance More
Layer Palette -
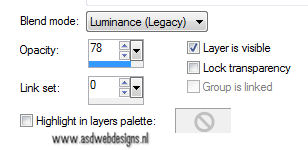
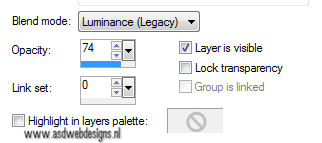
Double Click on this Layer and set
the Blend Mode to
"Luminance (Legacy)" and the Layer
Opacity to 78
Layers - Merge - Merge
Visible
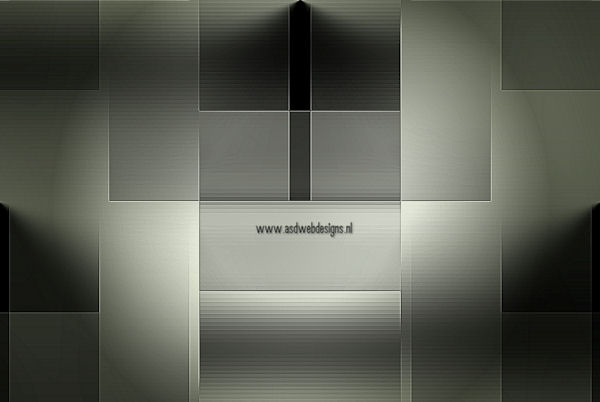
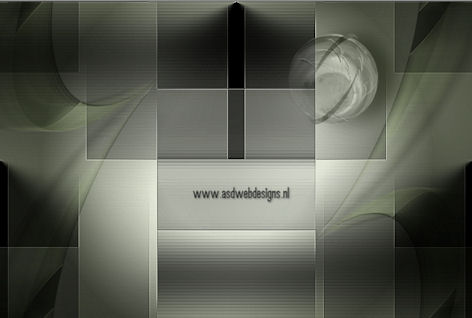
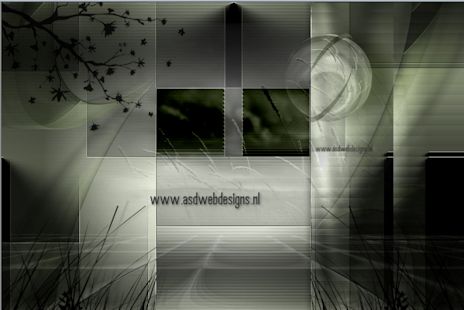
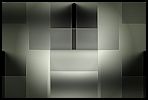
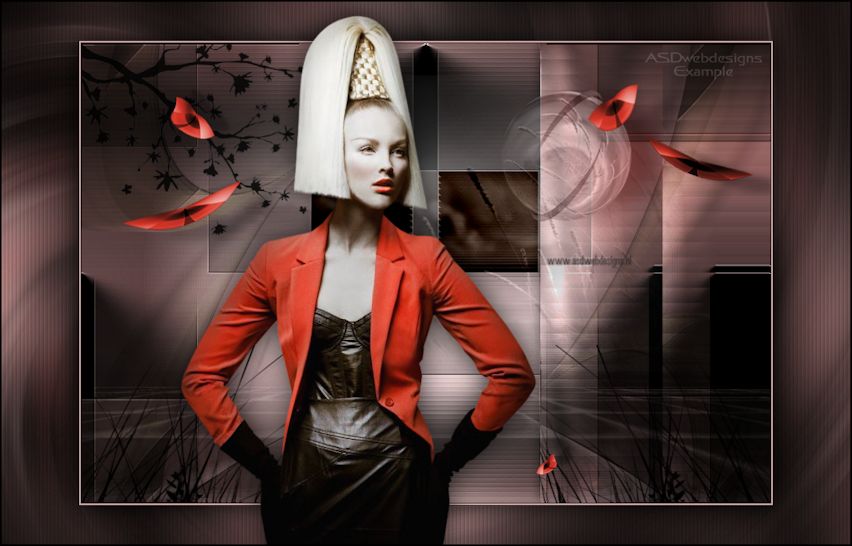
Your work looks like this now:
Window -
Duplicate (or shift+D) - Minimize to tray and
go back to the original
03
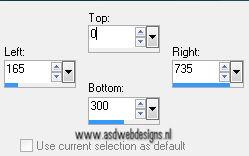
Selection Tool - Rectangle
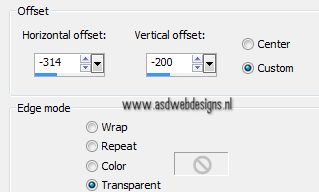
- Custom Selection:
Selections - Promote Selection to
Layer
Selections - Select None
Layers
- Duplicate
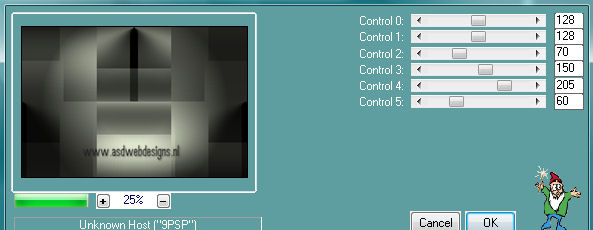
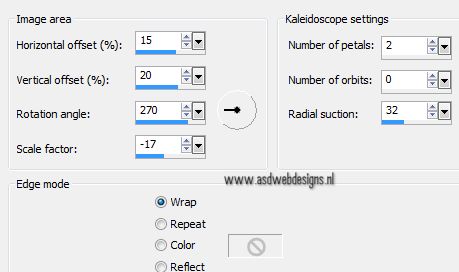
Effects - Plugins – Flaming Pear – Flexify 2
Clikc on the red arrow  and open Preset
Msb_Setting_FP_Flex_10-3-13_01
and open Preset
Msb_Setting_FP_Flex_10-3-13_01
Edit
- Cut
Edit - Paste as new image
Save as psp file and set aside
for now.
Return
to the main image
Layers - Delete
04
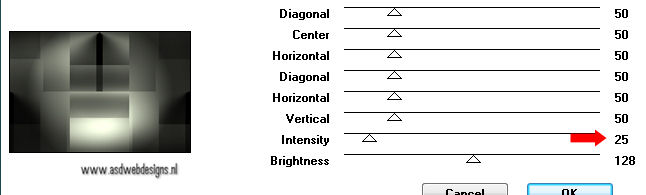
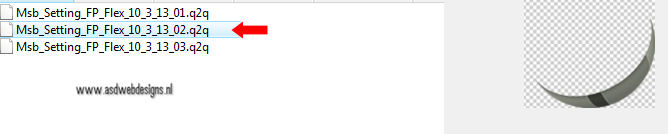
Effects - Plugins – Flaming Pear – Flexify 2
Clikc on the red arrow and open Preset
Msb_Setting_FP_Flex_10-3-13_02
Image - Free Rotate -
Left - Free - 61°
Move to the Right like
this:
05
Layers
- Duplicate
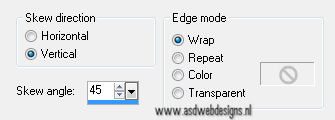
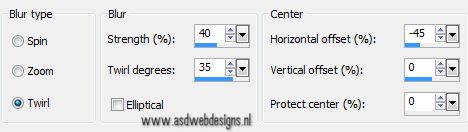
Effects -
Geometric Effects - Skew
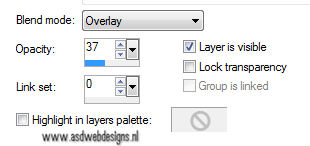
Layer Palette - Double Click on this
Layer and set the Blend Mode to
"Overlay" and the Layer Opacity to
37
Layers - Duplicate
Effects -
Distortion Effects - Wind - From Left checked -
Wind Strength: 100
Layer Palette - Double Click on this
Layer and set the Layer
Opacity of this layer to 100
Layers - Merge -
Merge Down
Layers - Duplicate
Image - Mirror
Image -
Flip
Layers - Merge -
Merge Down
Layers - Arrange -
Move Down
06
Layer Palette - Click on the top
layer
Layers - Duplicate
Image - Mirror
Image -
Flip
Layers
- Merge - Merge Down
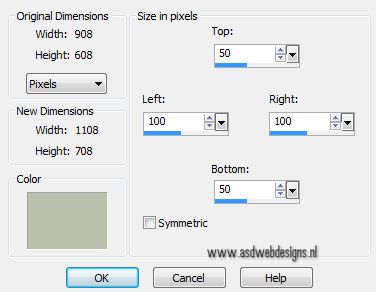
Image - Resize -
50% - Resize all layers not
checked
Image - Free
Rotate - Left - 90°
Effects - Texture
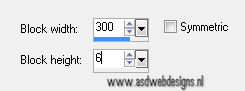
Effects - Blinds - Color: #000000 
Effects -
Geometric Effects - Skew
Image - Resize - 70% - Resize all
layers not checked
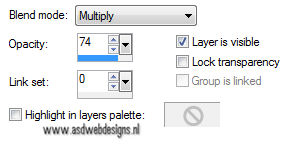
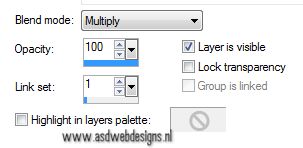
Layer Palette - Double Click on this
Layer and set the Blend Mode to
"Multiply" and the Layer Opacity to
74
07
Open Tube
"lunapaisagem4973"
Edit -
Copy
On your work
image: Edit - Paste As New Layer
Effects - Plugins – Flaming Pear – Flexify 2
Clikc on the red arrow and open Preset
Msb_Setting_FP_Flex_10-3-13_03
Image - Resize - 63% - Resize all
layers not checked
Layers
- Arrange - Move Down
Layer Palette - Double Click on this
Layer and set the Blend Mode to
"Luminance (Legacy)"
Layer Palette -
Click on the top layer
Layers - Merge -
Merge Down
Layer Palette -
Double Click on this Layer and set
the Layer Opacity of this layer to
74
Image - Resize
- 45% - Resize all layers not
checked
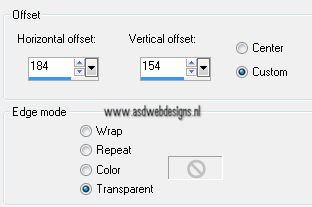
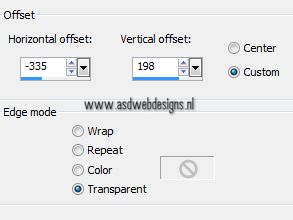
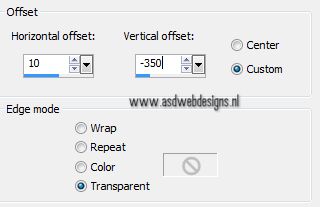
Effects - Image
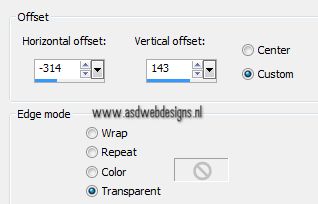
Effects - Offset
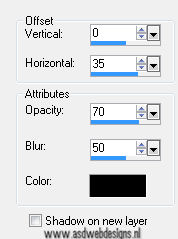
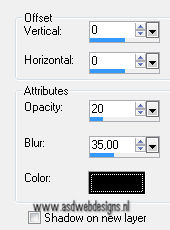
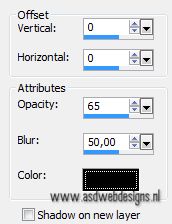
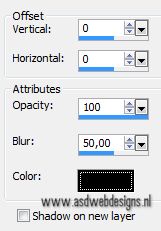
Effects 3D Effects - DropShadow -
Color: #000000
Adjust
- Sharpness - Sharpen
Your work looks like this
now:
08
Layer Palette - Click on the Bottom layer
Selections - Load/Save Selection - Load
Selection From Disk -
Msb_Sel_Paradise_01
Selections
- Promote Selection to Layer
Effects
- Plugins – RCS Filter Pack 1.0 – RCS Digi-Lens – Windows
Shades
Layer Palette - Double Click on this
Layer and set the Blend Mode to
"Burn" and the Layer Opacity to
86
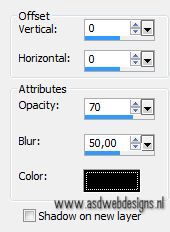
Effects 3D Effects - DropShadow
- Color: #000000
Selections - Select None
09
Layer Palette - Click on the Bottom layer
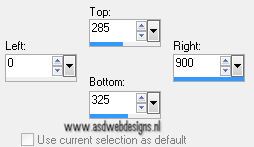
Selection Tool - Rectangle
 - Mode: Add (Shift)
Selections - Promote Selection to
Layer
Effects
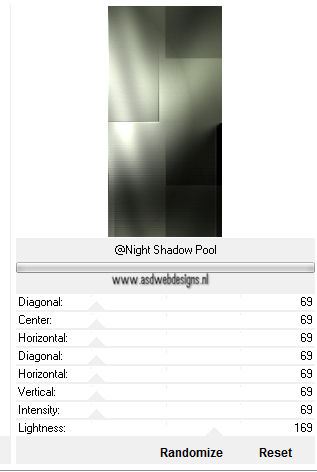
- Plugins - <I.C.NET Software> - Filters Unlimited -
Background designer IV - @Night Shadow
Pool
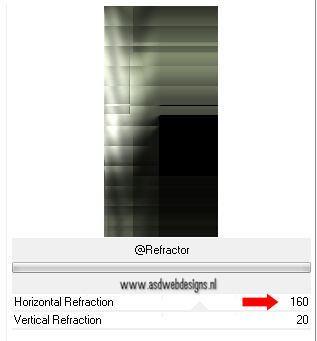
Effects - Plugins - <I.C.NET Software> -
Filters Unlimited - Backgrounddesigner IV -
@Refractor
Selections - Select None
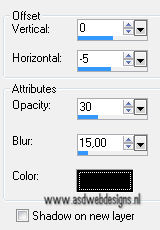
Effects 3D Effects - DropShadow - Color: #000000
10
Color Palette: Set your
Foregroundcolor back to color and change your Fore and
Backgroundcolor to #d1d1d1

Layers - New Raster
Layer
Selection Tool - Rectangle
- Mode: Add (Shift)
Fill the Selection with the
Foregroundcolor
Effects - Plugins - Toadies - What
Are You? - X-dose 0 - Y-dose
10
Effects - Plugins - Toadies - What
Are You? - X-dose 0 - Y-dose
5
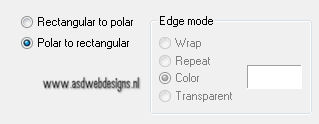
Effects - Distortion Effects - Polar
Coordinates
Effects
- Edge Effects - Enhance
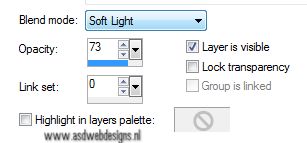
Layer Palette - Double Click on this
Layer and set the Blend Mode to
"Soft Light" and the Layer Opacity to
73
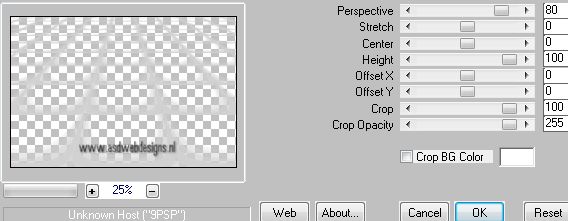
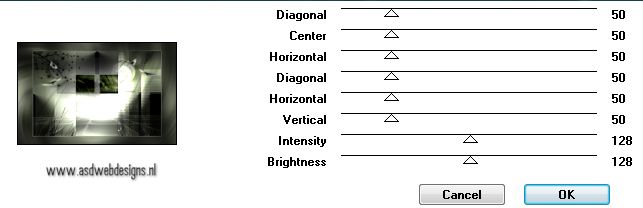
Effects
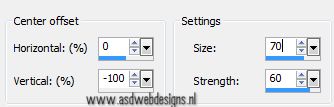
- Plugins – MuRa’s Meister – Perspective Tiling
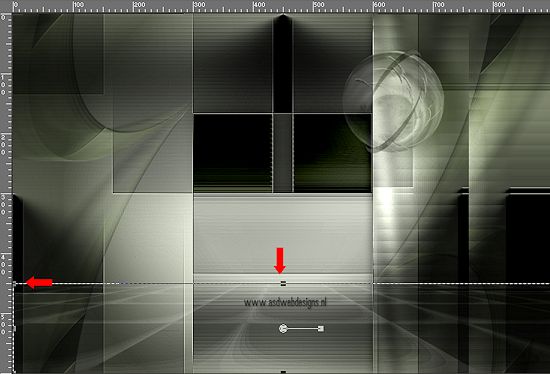
View
- Rulers
Hit the K or the D key of your
keyboard (depending on your PSP version) and pull the middle
node down to 450 px
Hit
any Tool to remove the deformation
Effects
3D Effects - DropShadow - Color: #000000
11
Go back to Tube
"lunapaisagem4973"
Edit -
Copy
On your work
image: Edit - Paste As New Layer
Image - Resize -
65% - Resize all layers not
checked
Layers - Arrange - Move Down
Layer Palette -
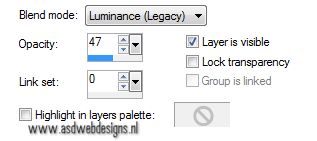
Double Click on this Layer and set
the Blend Mode to
"Luminance (Legacy)" and the Layer
Opacity to 47
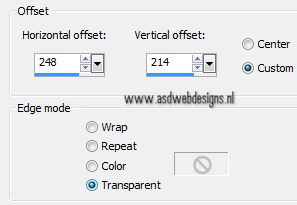
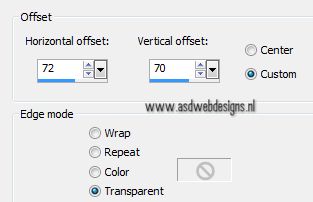
Effects - Image Effects - Offset
12
Open Tube
"Afbeelding9"
Edit -
Copy
On your work
image: Edit - Paste As New Layer
Image - Resize -
60% - Resize all layers not
checked
Layers - Arrange -
Bring to Top
Effects
- Image Effects - Offset
Layers - Duplicate
Image - Mirror
Layers
- Merge - Merge Down
Adjust
- Sharpness - Sharpen
Effects
3D Effects - DropShadow - Color: #000000
13
Open Tube
"pspB884"
Edit -
Copy
On your work
image: Edit - Paste As New Layer
Image
- Mirror
Selections - Select All
Effects
- Image Effects - Offset
Image
- Crop to Selection
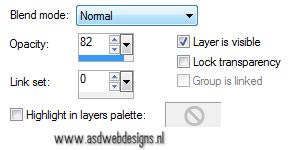
Layer Palette - Double Click on this
Layer and set the Layer
Opacity of this layer to 82
Effects
3D Effects - DropShadow - Color: #000000
Your work looks like this
now:
14
Go back to the image you have
set aside in step 3 
Edit -
Copy
On your work
image: Edit - Paste As New Layer
Image - Resize -
40% - Resize all layers not
checked
Layers
- Duplicate
Effects -
Distortion Effects - Wave
Image - Resize - 35% - Resize all
layers not checked
Effects
- Image Effects - Offset
Image - Free
Rotate - Right - Free - 45°
Layers - Duplicate
Image
- Mirror
Image - Resize - 70% - Resize all
layers not checked
Effects
- Image Effects - Offset
Layers - Merge - Merge Down
Adjust - Sharpness - Sharpen
Effects
3D Effects - DropShadow - Color: #000000
15
Layer Palette - Click on the Second layer from the
top
Layers
- Duplicate
Image - Resize - 70% - Resize all
layers not checked
Effects - Distortion Effects - Wave:
Image - Resize - 55% - Resize all
layers not checked
Image - Free
Rotate - left - Free - 35°
Effects
- Image Effects - Offset
Adjust
- Sharpness - Sharpen
Effects
3D Effects - DropShadow - Color: #000000
16
Layer Palette - Click on the Third layer from the
top
Effects - Distortion Effects - Warp
Image - Resize - 55% - Resize all
layers not checked
Image - Free Rotate - left - Free -
20°
Effects
- Image Effects - Offset
Effects
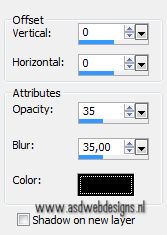
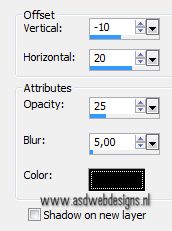
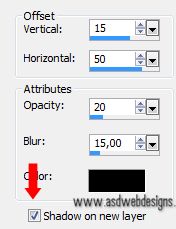
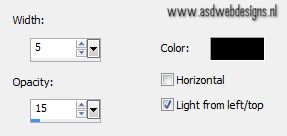
3D Effects - DropShadow - Color: #000000 - Check Shadow on new Layer!
Layer Palette - Click on the Third layer from the
top
Layers - Duplicate
Image - Mirror
Image - Resize - 90% - Resize all
layers not checked
Effects
- Image Effects - Offset
Effects
3D Effects - DropShadow - Color:
#000000
- Uncheck Shadow on new
Layer!
Adjust
- Sharpness - Sharpen
Layer Palette - Double Click on this
Layer and set the Blend Mode to
"Multiply"
17
Layers - New Raster Layer
Add your
name or watermark
Layers - Merge - Merge all (Flatten)
18
Color Palette: Set your
Foregroundcolor to #000000
and your Backgroundcolor to #bac0ac