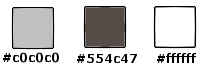
Effects - Plugins – Filters
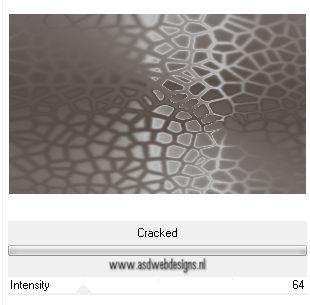
Unlimited – Distortion Filters – Cracked
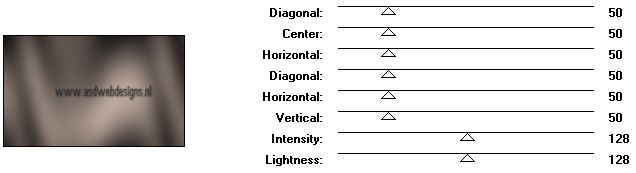
Adjust - Blur - Gaussian Blur - 10
Effects - Edge Effects - Enhance
More
02.
Layers - New Raster Layer
Fill
with the Backgroundcolor
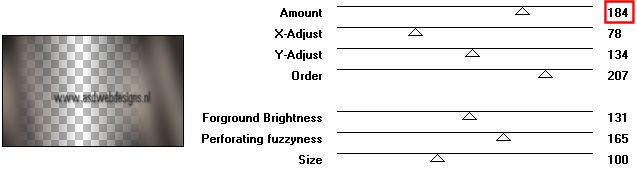
Effects - Plugins – Tramages –
Pool Shadow
Effects - Plugins – Tramages –
Perforator1
Effects - Edge Effects - Enhance
More
Layers - Merge - Merge Down
03.
Layers - Duplicate
Image - Resize – 80% - Resize
all layers not checked
Image - Free Rotate - Left -
90°
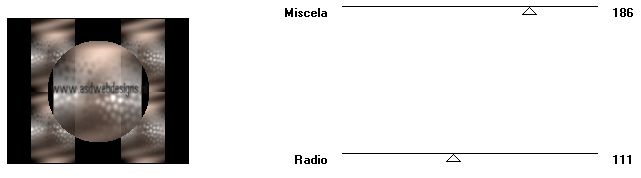
Effects - Plugins – Filter
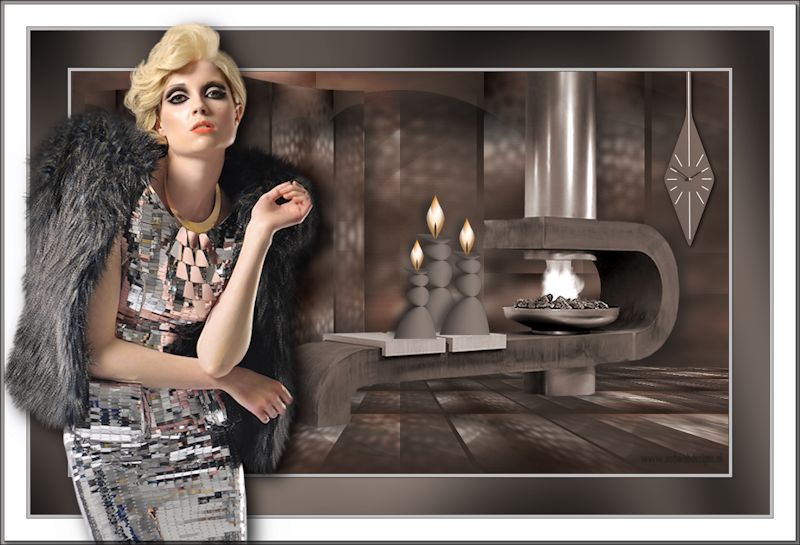
Factory Gallery V – Split Contrast
Effects - Plugins – Italian
Editors Effect – Picture in Picture
04.
Layers - Duplicate
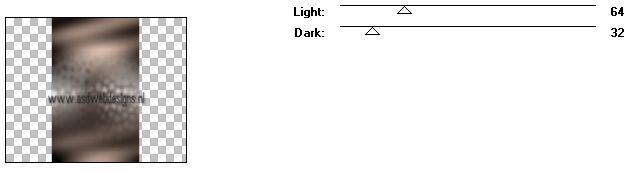
Effects - Plugins – Toadies –
What Are You? - 20 - 20
Layer Palette - Set the Blend Mode of
this layer to "Hard Light":
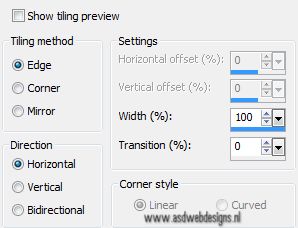
Effects - Image Effects - Seamless
Tiling
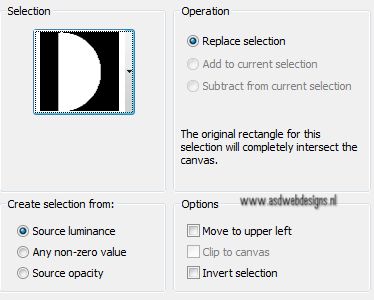
05.
Layer Palette - Click on the Bottom
layer
Selections - Load/Save Selection -
Load Selection From Disk -
MDlessen-selectie96
Selections - Promote Selection to
Layer
Selections - Select None
Layers - Arrange - Bring to Top
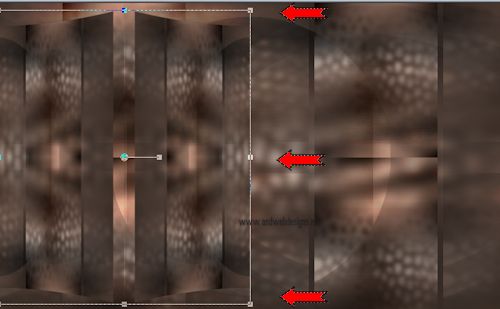
Effects - Geometric Effects -
Circle
It
looks like this now:
06.
Edit - Cut
It
is not on your work image anymore
Edit Paste as new Image!
Save
as PSP file (in case psp shuts down on you) and set aside for
now, you need it later!
07.
Go
back to your work image
Layers - Merge - Merge Visible
Layers - Duplicate
Image - Resize – 85% - Resize all
layers not checked
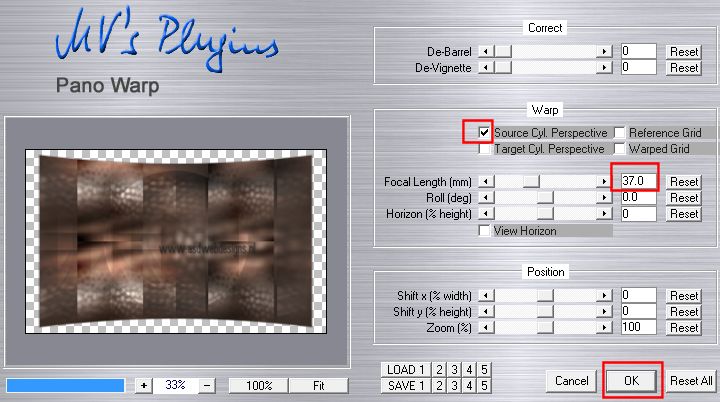
Effects - Plugins – MV’s Plugins
- Pano Warp
Effects - Plugins – Simple -
Left Right Wrap
Effects - Plugins – Simple - Top
Left Mirror
08.
Hit
the K key of your Keyboard (PSP 12 and lower: The D key of your
keyboard)
Set
the Mode to: Scale
Click with your mouse on the right
node
and
pull the image to the middle like this:
Hit
the M key of your Keyboard to add the deformation.
Image - Resize – 85% - Resize all
layers not checked
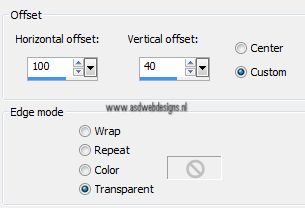
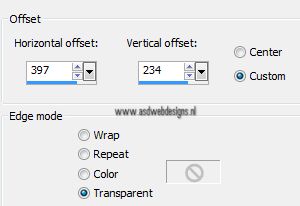
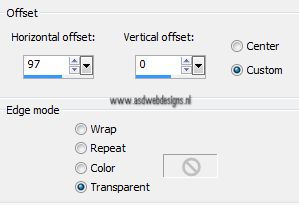
Effects - Image Effects -
Offset
Effects 3D Effects - DropShadow
- 10 - 10 - 65 - 40 - #000000
09.
Layer Palette - Click on the Bottom
layer
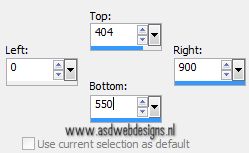
Selection Tool -
Rectangle  - Custom Selection:

Selections - Promote Selection to Layer
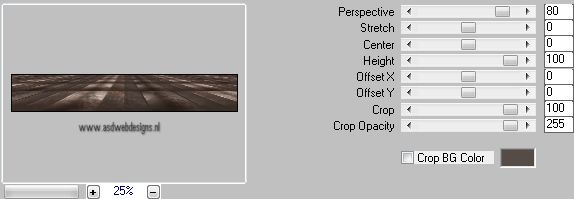
Effects - Plugins – MuRa’s
Meister – Perspective Tiling
Selections - Select None
10.
Open Tube "DBK FIREPLACE-004" -
Edit - Copy
On your work image - Edit
- Paste As New Layer
Layers - Arrange - Bring to Top
Image - Resize – 70% - Resize all
layers not checked
Image - Mirror
**
Users PSP 14 & 15
( use the new icons you
created!, see the tutorial
here
**
Effects - Image Effects -
Offset
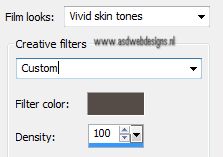
Effects - Photo Effects - Film and
Filters - Color: #554c47
Effects 3D Effects - DropShadow
- 10 - 10 - 65 - 40 - #000000
11.
Open Tube "calguisdeco08082012"
- Edit - Copy
On your work image - Edit
- Paste As New Layer
Image - Resize –
30% - Resize all layers not
checked
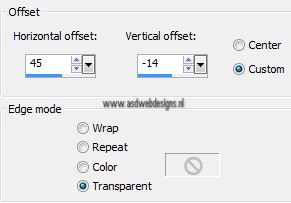
Effects - Image Effects -
Offset
Effecten – foto-effecten – Film and
Filters - Color: #554c47
Effects - Plugins - Alien Skin Eye
Candy 5 - Impact - Perspective Shadow
- Settings Tab: Dropshadow,
Lowest.
Layers - Merge - Merge
Visible
12.
Go
back to the image you have set aside in step 6.
Edit
- Copy
13.
Go
back to your work image
Edit
- Paste as new Layer
Image - Free Rotate - Left -
90°
Image - Resize – 35% - Resize all
layers not checked
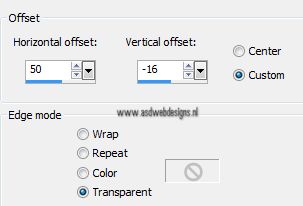
Effects - Image Effects -
Offset
14.
Open Tube "vlammetje" -
Edit - Copy
On your work image - Edit
- Paste As New Layer
Image - Resize – 30% - Resize all
layers not checked
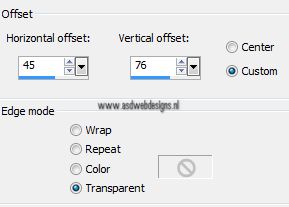
Effects - Image Effects -
Offset
15.
Layers - Duplicate
Image - Mirror
**
Users PSP 14 & 15
( use the new icons you
created!, see the tutorial
here
**
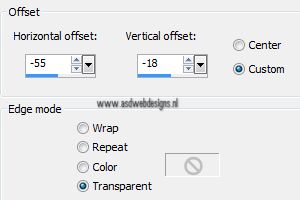
Effects - Image Effects -
Offset
Layers - Merge - Merge Down -
Repeat Once
Effects 3D Effects - DropShadow
- Minus 5 - Minus 8 - 65 - 20 - #000000
16.
Layers - Duplicate
Image - Resize – 85% - Resize all
layers not checked
Effects - Image Effects - Offset
17.
Layers - Duplicate
Image - Resize – 85% - Resize all
layers not checked
Effects - Image Effects - Offset
18.
Image - Add Borders - Symmetric
checked - 1 px - #554c47
Image - Add Borders - Symmetric
checked - 4 px - #c0c0c0
Image - Add Borders - Symmetric
checked - 1 px - #554c47
19.
Selections - Select All
Image - Add Borders - Symmetric
checked - 50 px - #554c47
Effects 3D Effects - DropShadow
- 0 - 0 - 45 - 5 - #000000
Selections - Invert
Effects - Plugins – Tramages –
Pool Shadow
Selections - Select None
20.
Image - Add Borders - Symmetric
checked - 1 px - #554c47
Image - Add Borders - Symmetric
checked - 4 px - #c0c0c0
Image - Add Borders - Symmetric
checked - 1 px - #554c47
Image - Add Borders - Symmetric
checked - 35 px - #ffffff
21.
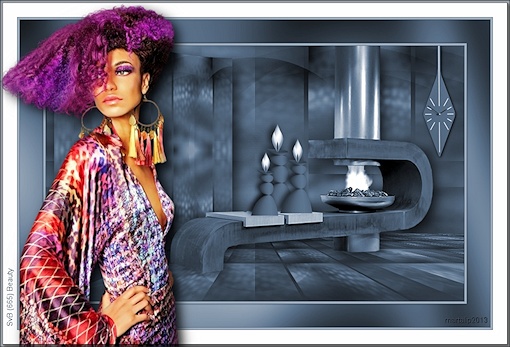
Open Tube "SvB (649)
Beauty" - Edit - Copy
On your work image - Edit
- Paste As New Layer
Image - Mirror
**
Users PSP 14 & 15
( use the new icons you
created!, see the tutorial
here
**
Image - Resize – 113% - Resize all
layers not checked
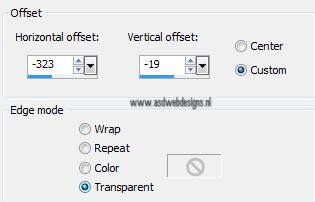
Effects - Image Effects - Offset
Effects - Plugins -
Alien Skin Eye Candy 5 - Impact -
Perspective Shadow -
Settings Tab: Dropshadow,Blurry.
22.
Image - Add Borders - Symmetric
checked - 1 px - #554c47
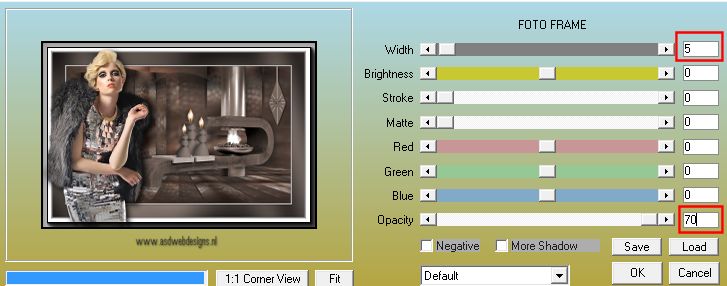
Effects - Plugins – AAA frames –
Foto Frame
23.
Image - Resize - Width 900
Pixels - Resize all layers
checked
Add your
name or watermark, save as JPG file and you're
done!